Using Docusaurus
Docusaurus is our documentation framework of choice (and you can see a record of that decision in this closed PR). One of the main reasons we picked this framework was because of how easy it was to manipulate the documentation without being an experienced software engineer. Here is a general outline of how to work with Docusaurus in a way that should be accessible to all of us on the project, from designers to product managers to engineers.
Note that to modify any part of the repo, you must be a member of the United States Transportation Command GitHub organization.
Edit a page
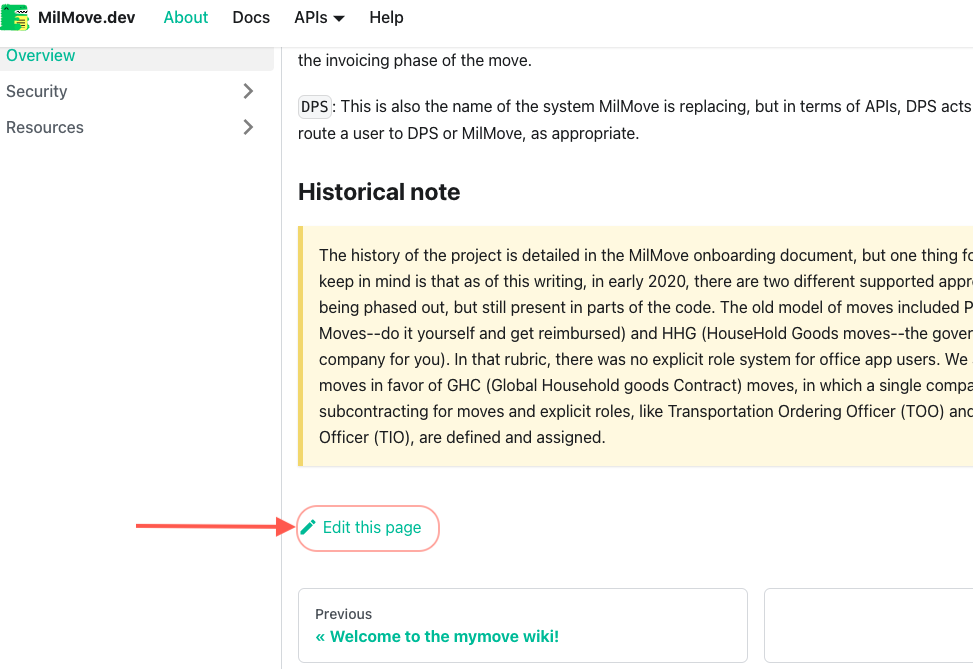
When you're browsing the docs and you come across a page you'd like to edit, scroll down to the very bottom and click the "Edit this page" button.

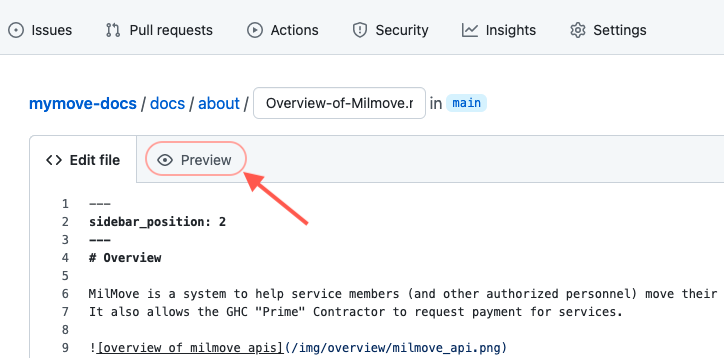
This should take you to the edit screen in GitHub for this particular markdown file. In this screen, you can edit the page however you please (we have instructions for some common edits below), and then preview your changes using the "Preview" tab at the top of the text box. Note there are some quirks about previewing your work in GitHub:
- Embedded images will not be shown in GitHub, but you will see them in the Docusaurus site.
- The frontmatter will be visible at the top of the page in GitHub, but this will not show up in Docusaurus.

You can also rename a file in GitHub. Keep in mind that this filename will be in the url for that page (unless otherwise specified in the frontmatter), so it should be lowercase and separated by hyphens (also known as kebab-case).
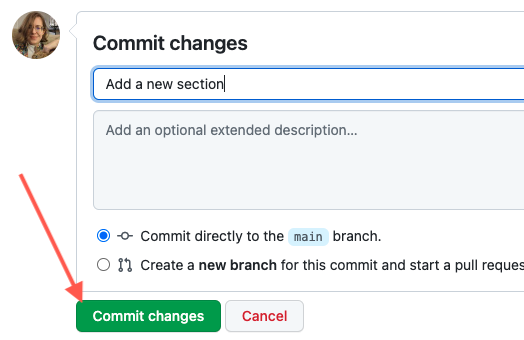
Once you are done, scroll down to the bottom and save your changes. You can write a description about what you changed as well, which is optional but encouraged.

Add a page
The file structure in our GitHub repo determines where your new page will show up in the deployed Docusaurus site. Therefore, you should first figure out what section your page belongs to and navigate to that directory in GitHub.
mymove-docs/
├── docs/  <- All of our docs should go in this directory
│   ├── getting-started/
│   │   ├── ^ These docs are a quick guide on how to get MilMove set up locally.
│   ├── api/
│   │   ├── ^ These docs are about the MilMove internal or external APIs.
│   ├── backend/
│   │   ├── ^ These docs are about the backend, which is a Golang server.
│   ├── frontend/
│   │   ├── ^ These docs are about the React frontend.
│   ├── help/
│   │   ├── ^ HALP! These docs should help folks resolve common issues encountered in the system.
│   ├── vault/
│   │   ├── ^ This folder is the place to store experimental, archived, or deprecated docs.
Once you're in the directory for your new page, click on the "Add file" dropdown near the top right. Select the "Create new file" option.

You can also write a markdown document on your computer and upload it using the "Upload files" option. If you have a markdown editor that you're comfortable with, or if you only want to add the document once it's fully complete, this might be the option for you.
Add your content. This process is the same as editing a page. Once you are done, scroll down to the bottom and commit your changes.
Delete a page
Before you delete a page, first ask yourself: "Am I sure this content needs to be fully removed, or could it be useful somewhere else?" If you could envision the document being useful in Confluence, or by providing historical insight, consider moving it to the Vault instead. This folder is intended to hold archived, experimental, and misplaced documentation. It will be reviewed periodically and moved or deleted later, if deemed necessary.
If you are confident that this page can be truly deleted, first locate the markdown file in GitHub. While viewing the file, click the button near the top right corner that looks like a trashcan.
On the following screen, scroll down to the bottom and commit the deletion just like you would any other change.
Move a page
Moving a page in GitHub is trickier than any other functionality. To do this in the browser, you would need to:
- Copy all the contents of the page in the old location.
- Create a new page in the desired location, paste in the contents, and save.
- Go back to the old page and delete it.
This is kind of a pain. I would recommend checking the repo out and moving files locally on your machine, if that is something you're comfortable with doing. Some instructions for how to get set up are in the README for this repo.
Common edits
These are some common edits you might want to make to the documentation. The official documentation for Docusaurus also contains an exhaustive overview of the features available to you. It is recommended to read through their docs for more context and instructions.
Frontmatter is the part of a markdown page that contains meta-information about that page. Tags, labels, and sidebar settings can be specified in the frontmatter. For more information, read Docusaurus' official documentation.
Change the title
If there is no top-level header, the title of the page will default to the filename. We usually don't want this to be the case.
The easiest way to specify a different title is to set a top-level header with the desired value:
# My title
This will appear as the name of the page on the sidebar and in the page itself. If you want to specify a different title for the sidebar, you can do so in the frontmatter:
---
title: My sidebar title
---

# My title
If you remove the top-level header from this document, Docusaurus will automatically replace it with whatever you have specified as the title in the frontmatter.
Change the sidebar position
Sidebars are set up to autogenerate based on their parent folder (within the docs/ directory). Without any other instructions, the order of the pages will default to an alphabetized order. If you want to specify a position, you can do so in the frontmatter of a page:
---
sidebar_position: 1
---
If you are trying to change the position of a subfolder in the sidebar, you can add a _category_.json file to the directory in question with the desired position:
{
  "label": "My Subcategory",
  "position": 2
}
Change the URL
The URL for a page is tied to the filename, so one way to change the URL is to change the filename. This will be the best option for most situations. The other method is to specify the URL using the slug option in the frontmatter:
---
slug: /other-url
---
Add images
Images and all other static files are saved in this repositories static/ folder. Within this folder, there is a directory for images specifically: static/img/.
To add your image, you must first upload it to this folder (ideally in a subdirectory that helps clarify what page it's used on). Once you have uploaded the image, you can embed it in any markdown file with the syntax:

Broken image links will break the build for Docusaurus, so please be careful when moving or renaming images. You must follow the above syntax exactly for the link to work.
If the build is broken and the site cannot redeploy, please contact an engineer to help resolve the issue. There will still be an old version of the site deployed, so this is not a crisis.
Add a code block
Code blocks work as they normally do in markdown files, but now you can add titles and highlight important lines. Use this syntax to add a title and highlight:
    ```js title="Hello, JavaScript!" {2}
    function helloWorld() {
      console.log('Hello, world!');
    }
    ```
function helloWorld() {
  console.log('Hello, world!');
}
More variations on this syntax are available in the Docusaurus official documentation.
Linking between pages
This section of documentation deals with working with the documentation project locally and can lead to errors or warnings in the server output of Docusaurus. For help, please reach out in #wg-documentation🔒 if you get stuck.
See the official Docusaurus documentation around linking documentation pages together for more general information. The goal for this documentation is to help ease the transition from linking documentation pages with GitHub wiki versus Docusaurus.
So the main differences between GitHub Wiki linking and Docusaurus linking is
that linking between documents can be relative to the file you're working with
or absolute to how it's laid out in the directory structure of the
transcom/mymove-docs documentation directory.
For example, linking to Access a Global Application Variable in Docusaurus means that you can link to it like this.
[Access a Global Application Variable](../dev/contributing/backend/environment_variables/access-global-variables.md#how-to-access-a-global-application-variable)
Notice in the above example that the path (../dev/contributing/backend/)
is relative to the file docs/getting-started/Home.md.
[Access a Global Application Variable](/docs/dev/contributing/backend/environment_variables/access-global-variables.md#how-to-access-a-global-application-variable)
Notice in the above example that the path (/docs/dev/contributing/backend/)
matches the directory structure of the transcom/mymove-docs project.