Creating an Endpoint
These are the various steps that are involved in creating a new endpoint.
Prior to creating an endpoint in the Handler folder, we must first add a new endpoint definition to swagger. We are using Swagger 2.0, which is OpenAPI, a specification we use to format our RESTful APIs and provide a template for us to communicate the information in our API. Always start with swagger. This step creates your endpoint definition and generates the files and helper functions you will need to create your endpoint. More specifically, swagger converts JSON user input into generated Go types.
Adding a new entry into the yaml
All new definitions will be added in mymove/swagger-def. Note that we have broken down our spec into different files and we share definitions between files.
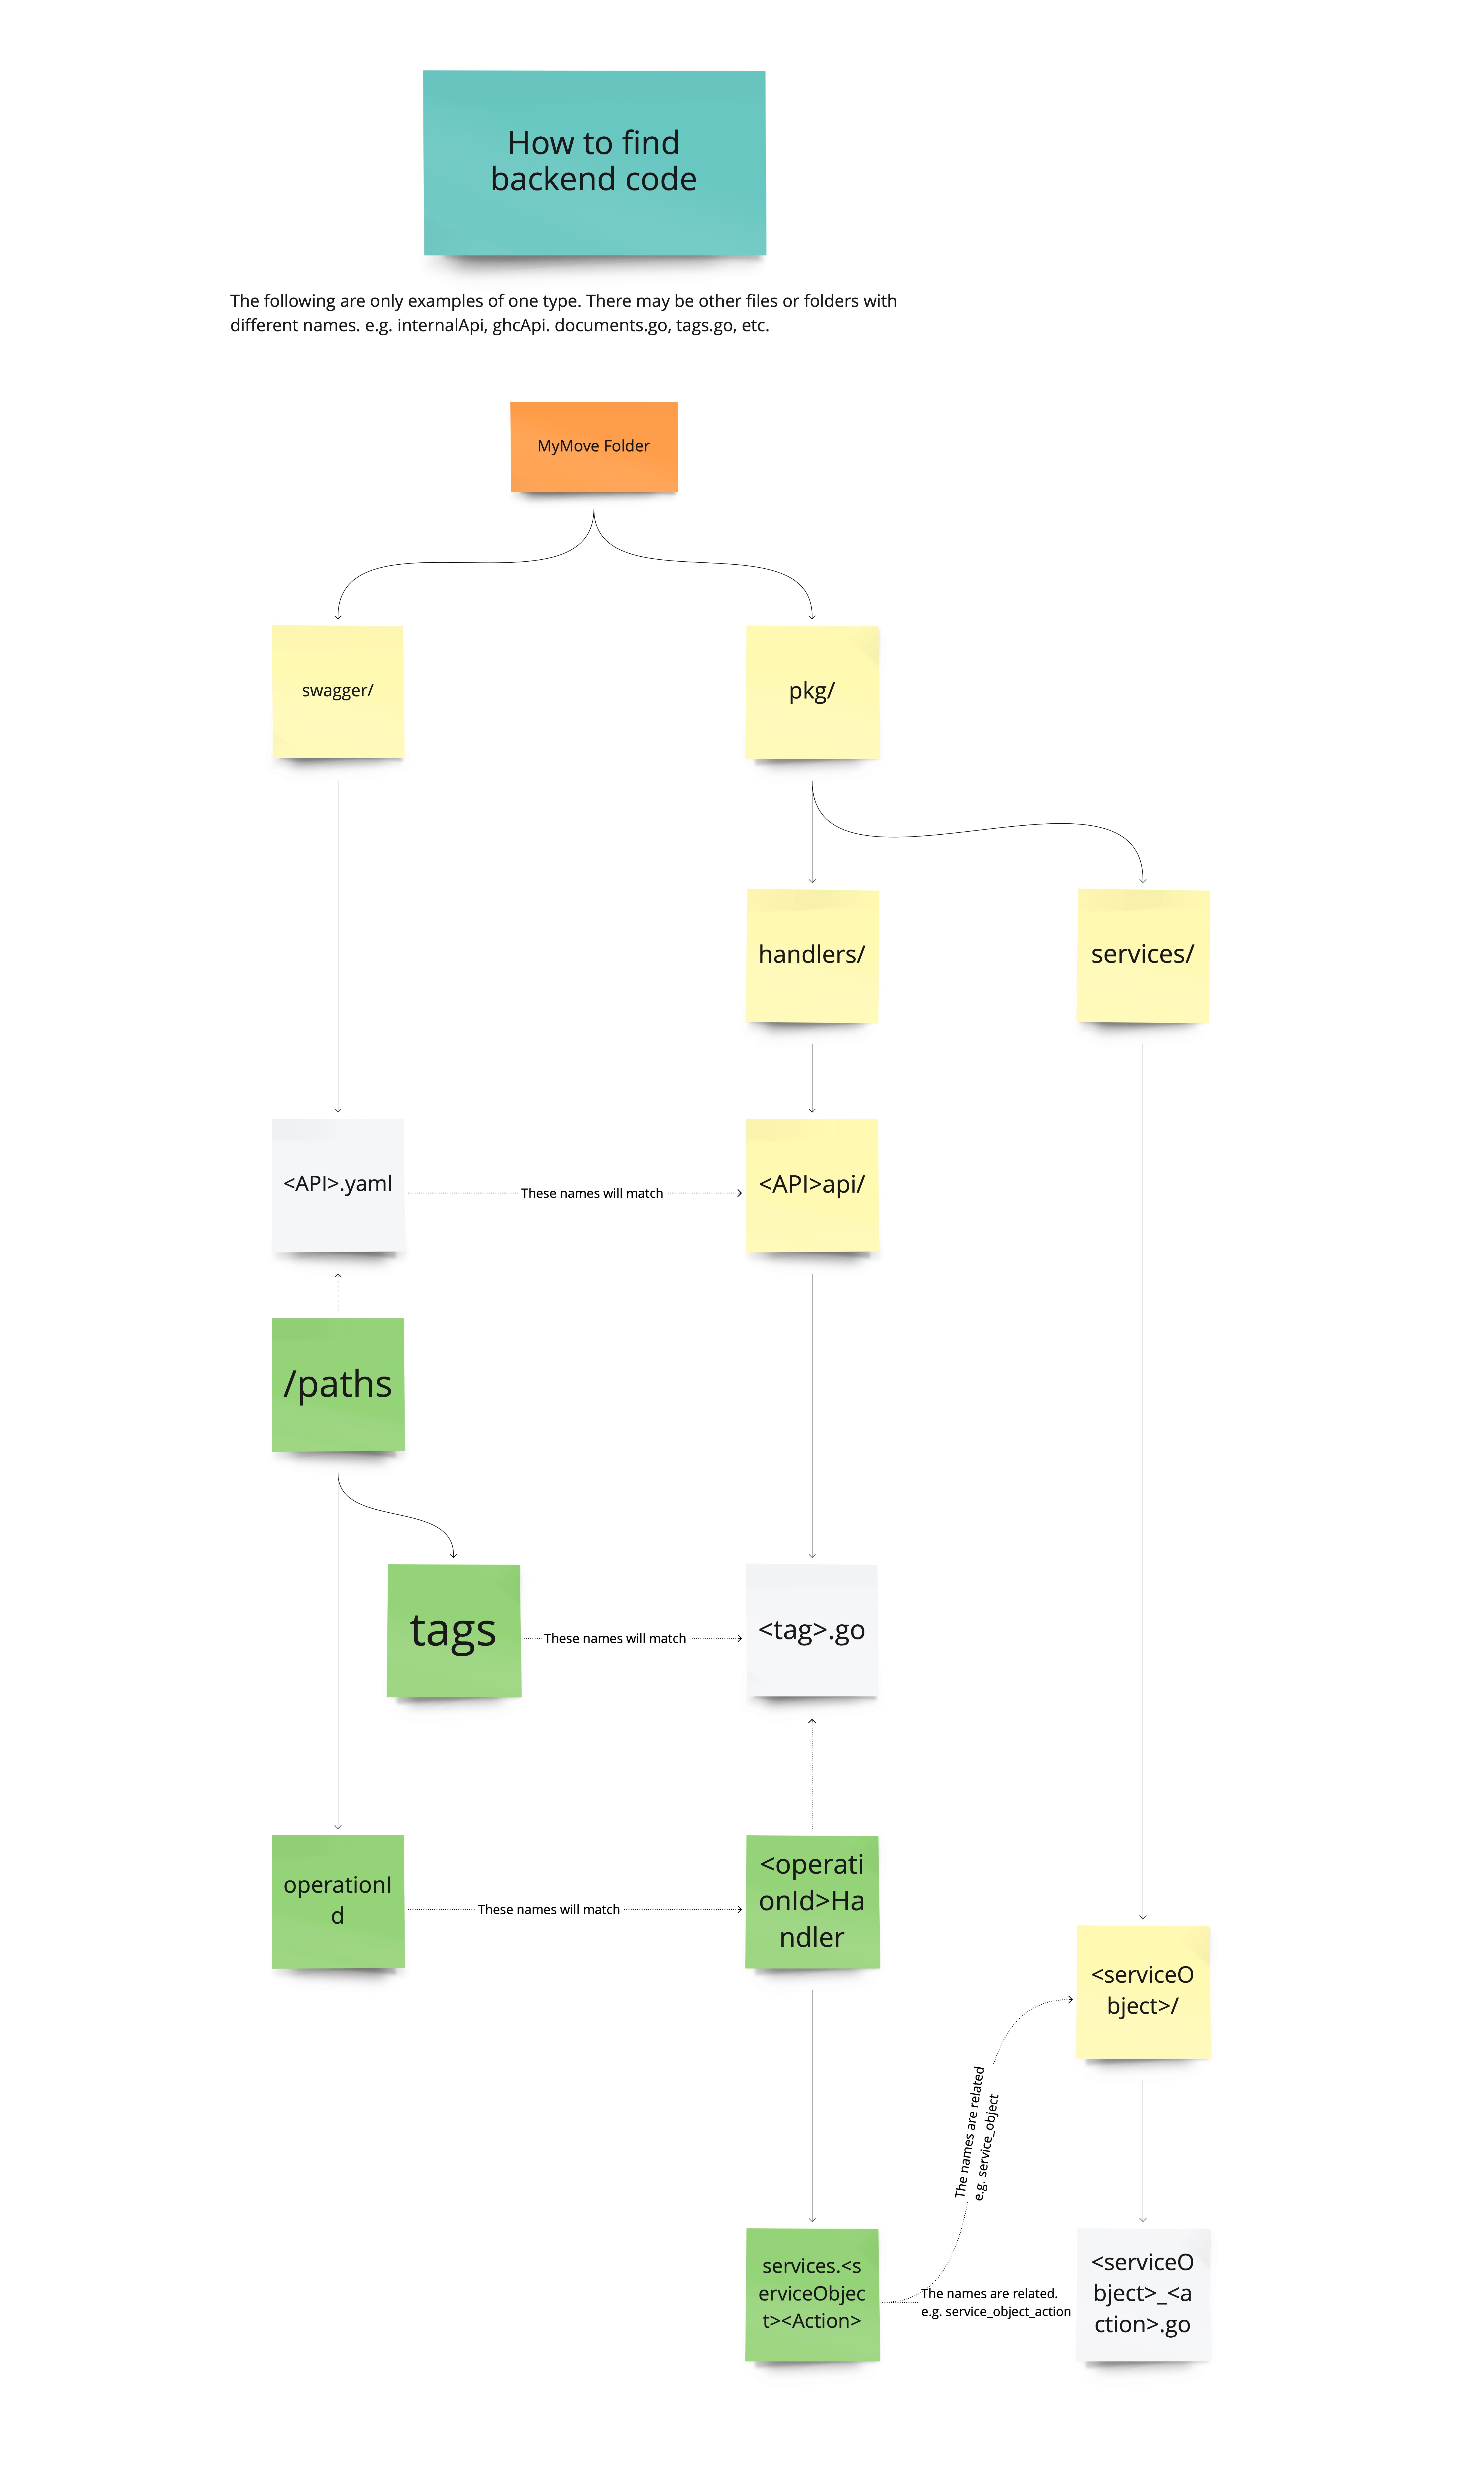
Built compiled versions of our API spec will be generated and stored in the swagger folder, which we will not edit directly. Notice that there is a yaml file for each of our APIs.
An endpoint definition for the prime will go into the Prime yaml, but you may notice there are some definitions in mymove/swagger-def/definitions.
This is because some definitions are shared across APIs and we've created a space to add those definitions in one place.
For example, Uploads.yaml shares its definition across various APIs, and rather than creating various yaml files for this action, we have created one and added it to the shared definitions folder.
For the purposes for adding a new endpoint, make sure that your endpoint is defined in these sections:
tags- is where we group all of our endpoints by category (i.e. shipment endpoints, agent endpoints, service item endpoints, etc.). This top level field is where our gen files will divide the endpoints into their own packages. Tag component names arecamelCase.paths- defines our endpoint. Path names usekebab-case.definitions- defines the shape of the data for our endpoint. Definitions component names arePascalCase.responses- define what the endpoints return. Responses component names arePascalCase.parameters- define what an endpoint needs (e.g. headers). Parameter component names arecamelCase.
Troubleshooting your local swagger state:
If you are having issues with your local swagger state it is recommended to run make server_generate, accept the prompt, and then run make server_run again. For more information on troubleshooting, this explanation will be helpful.
Defining a path for your endpoint
For more information about URL design and structure checkout: API Style Guide
Defining your endpoint path follows this simple convention:
    /your path:
        HTTP request:
            summary: this is the name of the action your endpoint performs, in camelCase
            description: new convention is to reference description files in the swagger-def/info/ folder
            operationId: this should match the endpoint title in the definitions section and summary in your paths section.
            tags: matches the tag section for this endpoint
            produces: this field will always be application/json
            parameters: include parameters associated with this path
            responses: response codes for this path, and a schema reference and the description if needed.
NOTE: The description item will reference markdown files in swagger-def/info/. This change is further described in a recent PR.
An example of the Moves path is as follows:
  /moves:
    get:
      summary: listMoves
      description:
          $ref: 'info/{file_name}.md'
      operationId: listMoves
      tags:
        - moveTaskOrder
      produces:
        - application/json
      parameters:
        - in: query
          name: since
          type: string
          format: date-time
          description: Only return moves updated since this time. Formatted like "2021-07-23T18:30:47.116Z"
      responses:
        '200':
          description: Successfully retrieved moves. A successful fetch might still return zero moves.
          schema:
            $ref: '#/definitions/ListMoves'
        '401':
          $ref: 'responses/PermissionDenied.yaml'
        '403':
          $ref: 'responses/PermissionDenied.yaml'
        '500':
          $ref: '#/responses/ServerError'
Description Section and the response body
In your endpoint description make sure that the following fields are included when necessary:
required- fields that are required are listed in the description section.x-nullable- this indicates that the value of a particular property may be null. It will also return null if the value doesn't exist otherwise it will be omitted if x-nullable is false.x-omitempty- this extension is good to add and set it to false if we don't want that field to be omitted if it is empty.readOnly- sometimes you will need specify a ready-only property, for example when the property differs in a GET from a POST or PATCH. Note:readOnlyproperties are included in responses but not in requests.eTag- An entity tag is provided so that a browser client or a script can make conditional REST requests using optimistic concurrency control. AlleTagsmust be marked asreadOnly.
An example of the ListMove description is as follows:
      ListMove:
        description:
            $ref: 'info/{file_name}.md'
        type: object
        properties:
          id:
            example: 1f2270c7-7166-40ae-981e-b200ebdf3054
            format: uuid
            type: string
          moveCode:
            type: string
            example: 'HYXFJF'
            readOnly: true
          createdAt:
            format: date-time
            type: string
            readOnly: true
          orderID:
            example: c56a4180-65aa-42ec-a945-5fd21dec0538
            format: uuid
            type: string
          referenceId:
            example: 1001-3456
            type: string
          availableToPrimeAt:
            format: date-time
            type: string
            x-nullable: true
            readOnly: true
          updatedAt:
            format: date-time
            type: string
            readOnly: true
          ppmType:
            type: string
            enum:
              - FULL
              - PARTIAL
          ppmEstimatedWeight:
            type: integer
          eTag:
            type: string
            readOnly: true
For information on error responses, check out: API Errors Guide
Gen files:
Once you finishing updating the yaml files with the new endpoint information make sure to run your make commands like make swagger-generate to autogenerate your swagger files, or simply run make server_run,
which runs your server and other useful make commands in one go.
Swagger overview
Swagger Architecture
Link to a pictorial view of how the Swagger packages map from yaml to Go files and functions. Highlighting paths,
tags, and operationId.

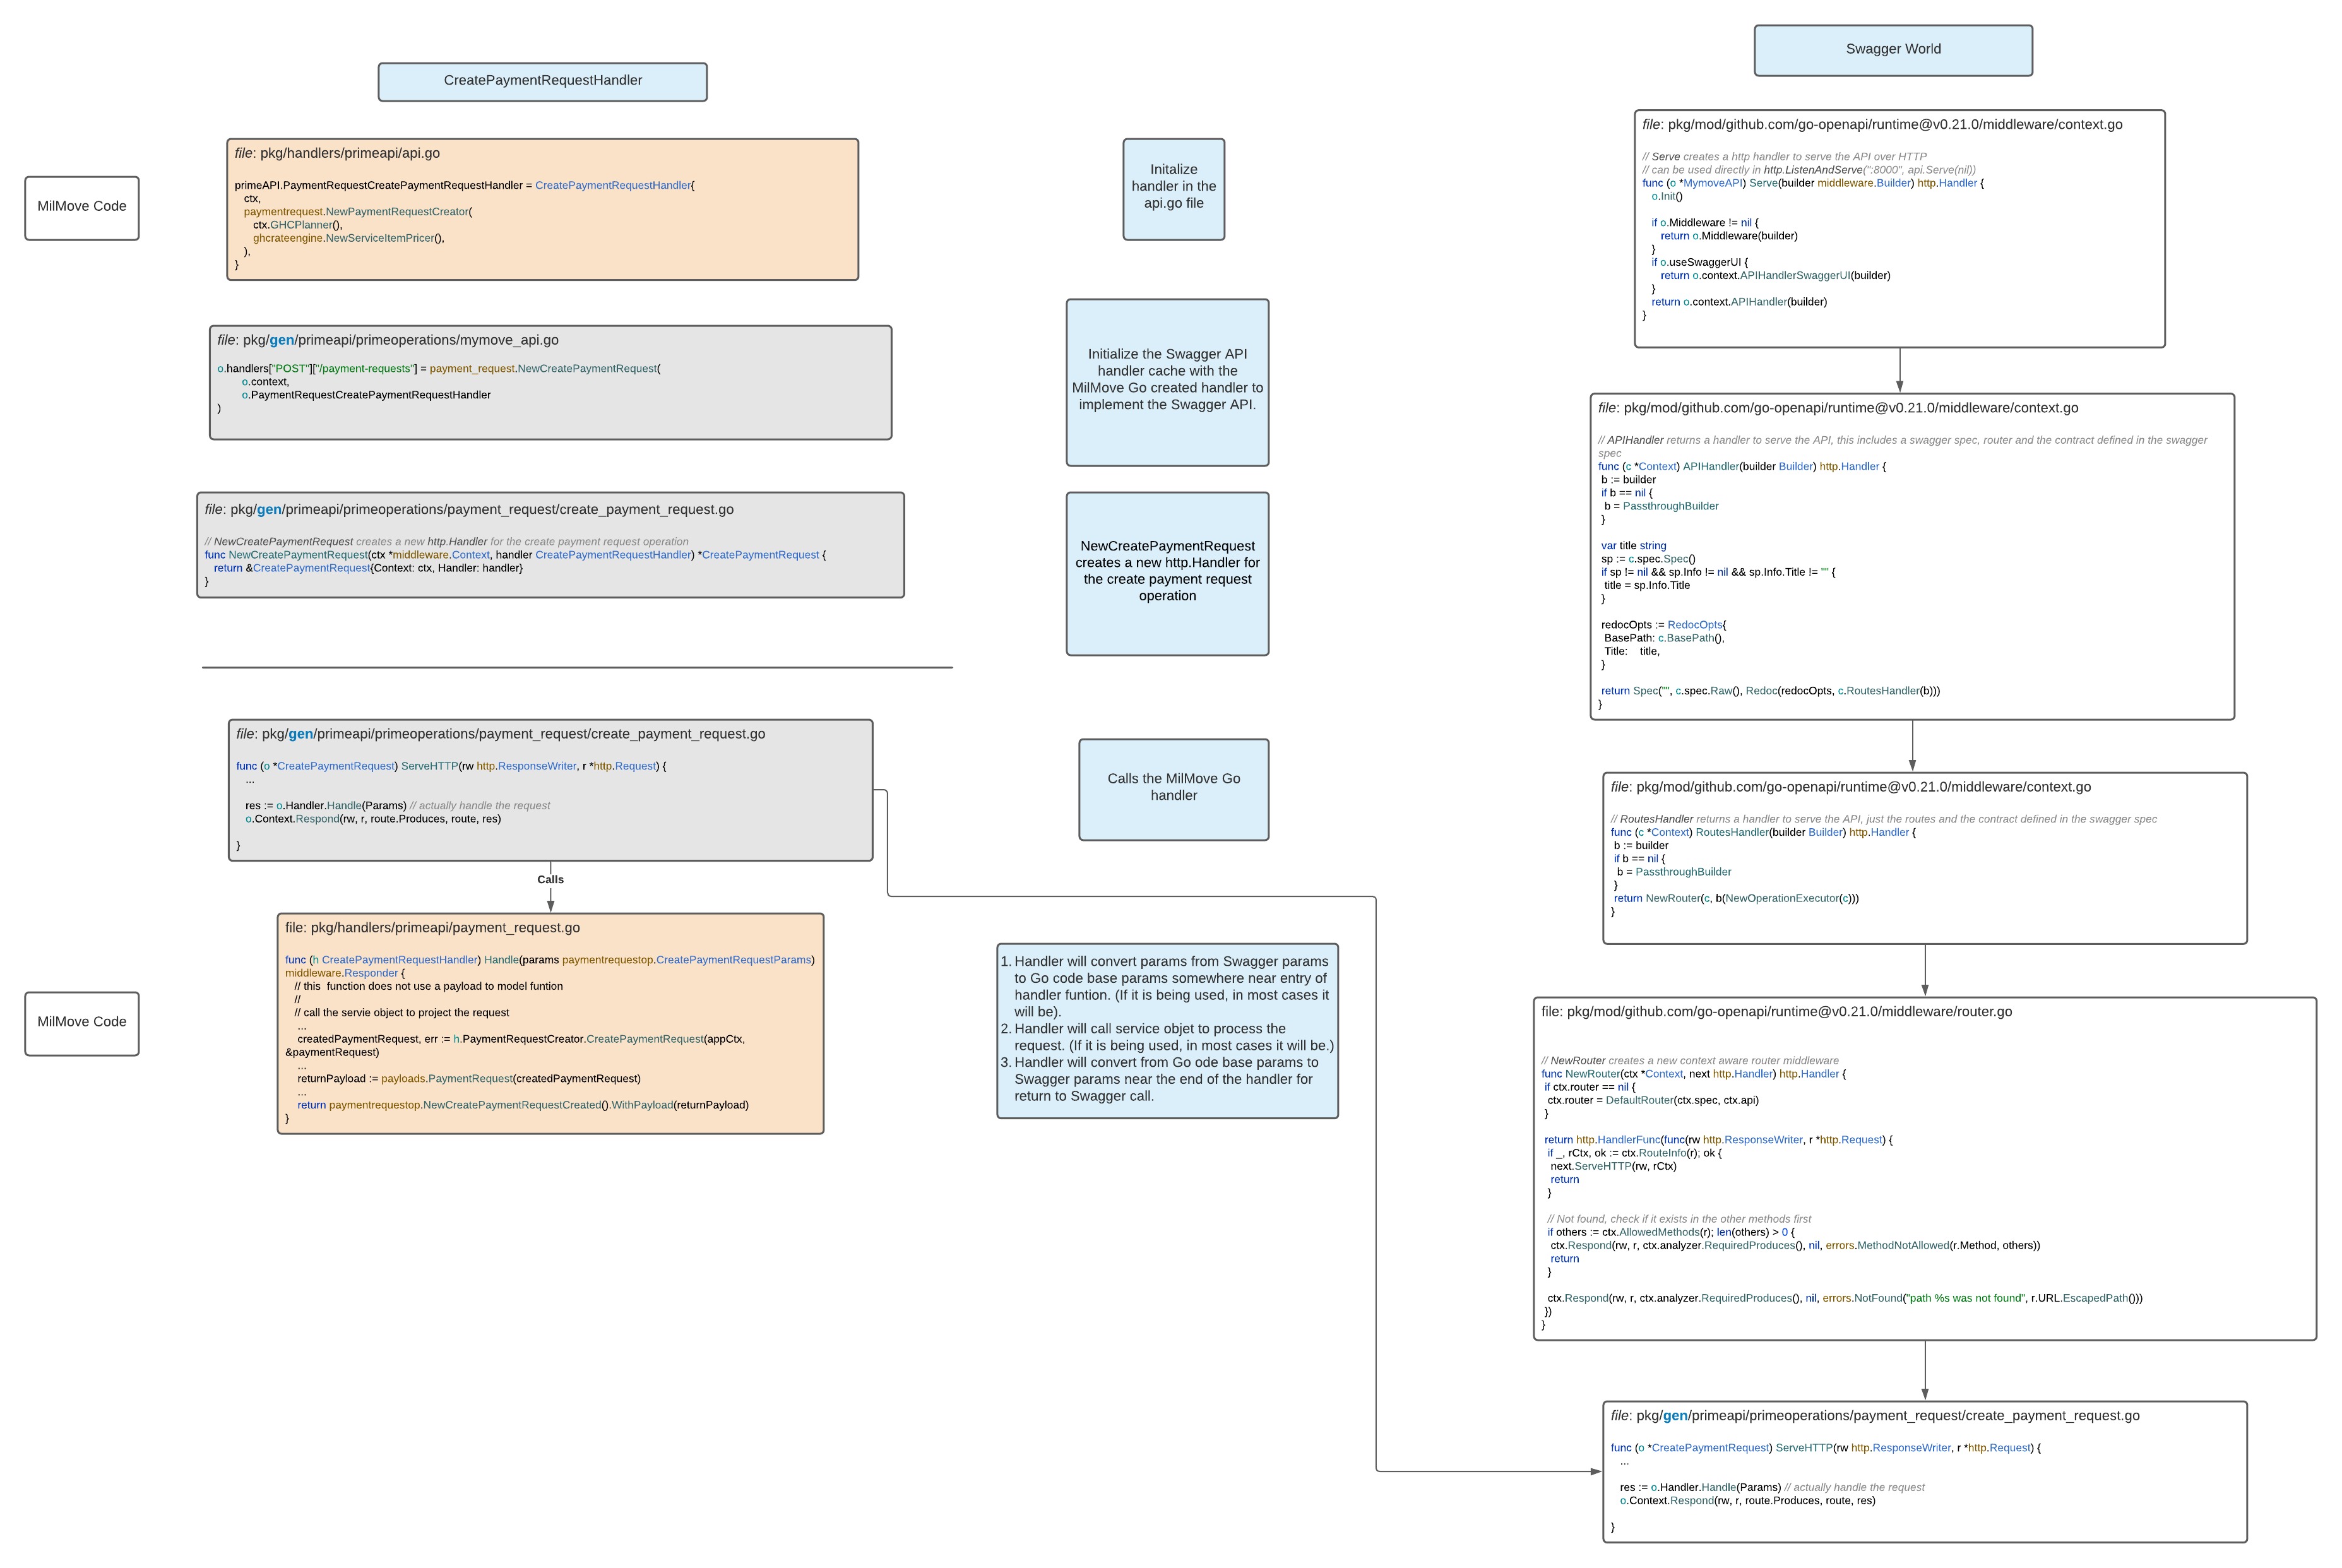
Example diagram of how Swagger calls our handler functions:

Creating a Handler:
Now you're ready to add your endpoint to the handlers folder. Start building out the service object before creating your handler.
For more information about service objects and when to create one: Service Objects.
An important note about service objects: The service layer is where we will store our business logic and connect to the database. Once a service object is created, it will be passed in to the handler NewPrimeAPIHandler function in pkg/handlers/primeapi/api.go,
and the handler will only be aware of the service object interface, while the service object will contain all of the rules and validations as well as accessing object from the database.
Handlers must never hit the database. Ideally, endpoint handlers are for type validations.
Handlers are also where we convert from payload (Swagger types) to model
(MilMove Go types). Generally, before calling the service object to process the
request, you would call the appropriate payload_to_model.go function. And
after returning from the call to the service object you would call the
appropriate model_to_payload.go function.
Steps to creating a new handler:
- Add a handler for the endpoint.
- Update the
api.gofile depending on which API you are updating:
- Update the
pkg/handlers/
    adminapi/api.go
    ghcapi/api.go
    internalapi/api.go
    ordersapi/api.go
    primeapi/api.go
    supportapi/api.go
Add payload_to_model converters
- This is a good place to check data types and null values.
- Each API has a set of
payload_to_model.goandmodel_to_paylaod.gofiles under theinternaldir:
pkg/handlers/
    adminapi/internal/payloads
    ghcapi/internal/payloads
    internalapi/internal/payloads
    ordersapi/internal/payloads
    primeapi/internal/payloads
    supportapi/internal/payloads
model_to_payload functions
- Once we have either modified the model or added something to our model, it must be converted back into a payload in order to be returned by the handler.
- Each API has a set of
payload_to_model.goandmodel_to_paylaod.gofiles under theinternaldir:
pkg/handlers/
    adminapi/internal/payloads
    ghcapi/internal/payloads
    internalapi/internal/payloads
    ordersapi/internal/payloads
    primeapi/internal/payloads
    supportapi/internal/payloads
Create handler type and Handle function
- Handlers are stored in this area depending on which API you are updating:
pkg/handlers/
    adminapi/
    ghcapi/
    internalapi/
    ordersapi/
    primeapi/
    supportapi/
Add tests for the handler
- Add test code
* Use `testdatagen` functions [Understanding `Testdatagen` Functions](/mymove-docs/docs/backend/testing/understanding-testdatagen-functions) - Add mocks (only if absolutely necessary): Generating Mocks with mockery
- Add test code
Anatomy of a handler
This documentation is currently in transition while handlers are being
refactored to use AuditableAppContextFromRequestWithErrors rather than extracting the
AppContext from the request.
All handlers should begin by storing the DB, logger, and/or session from the request into the AppContext. This is the easiest way to get all three:
appCtx := h.AppContextFromRequest(params.HTTPRequest)
return h.AuditableAppContextFromRequestWithErrors(params.HTTPRequest,
    func(appCtx appcontext.AppContext) middleware.Responder {
    // contents of handler
    })
The new way of using the appCtx is to avoid some latent bugs where the
codebase was starting transactions but not running SQL inside of the
transaction due to referencing the incorrect dbconnection/appCtx from
"outside" the transaction. With the addition of
AuditableAppContextFromRequestWithErrors, we now start a transaction and pass that into
handlers to ensure that all handlers are running inside a transaction.
This is done for multiple reasons, such as audit logging where we run
RawQuery to set local variables that contain the userID from the appCtx
Session.
And then this appCtx will be passed in as the first argument to any service object function. For example:
shipment, err := h.RejectShipment(appCtx, shipmentID, eTag, rejectionReason)
The DB, logger, and session can then be extracted from the app context like so:
appCtx.DB()
appCtx.Logger()
appCtx.Session()
Below are other ways to grab the logger and session from the request, and populating the AppContext with them.
Grab just the logger:
logger := h.LoggerFromRequest(params.HTTPRequest)
or the session and logger:
session, logger := h.SessionAndLoggerFromRequest(params.HTTPRequest)
Then, store the DB connection and logger in the App Context:
appCtx := appcontext.NewAppContext(h.DB(), logger)
If you also need the session, you can do all three at once:
appCtx := appcontext.WithSession(appcontext.NewAppContext(h.DB(), logger), session)
Validating Response Payload
We need to ensure that the data that is being returned from the handler matches what is defined in the swagger definition.
In your tests you should call Validate on the payload. Something
like ...
    handler := ListMovesHandler{HandlerConfig: context, MoveTaskOrderFetcher: movetaskorder.NewMoveTaskOrderFetcher()}
    response := handler.Handle(params)

    suite.IsNotErrResponse(response)
    listMovesResponse := response.(*movetaskorderops.ListMovesOK)
    movesList := listMovesResponse.Payload

    // Validate the payload response
    suite.NoError(movesList.Validate(strfmt.Default))
Authorization
You'll notice that many handlers perform authorization within the handler, such as:
if !session.IsOfficeUser() || !session.Roles.HasRole(roles.RoleTypeTOO) {
    logger.Error("Only TOO role can reject shipments")
    return shipmentops.NewRejectShipmentForbidden()
}
This duplicated logic can be extracted into a service object. Perhaps something like this:
func (f *authorization) TOOAuthorized(appCtx appcontext.AppContext) bool {
  session := appCtx.Session()

  return session.IsOfficeUser() && session.Roles.HasRole(roles.RoleTypeTOO)
}
and then the handler would be updated like this:
if !h.TOOAuthorized(appCtx) {
  logger.Error("Only TOO role can reject shipments")
  return shipmentops.NewRejectShipmentForbidden()
}
Connecting the Handler to the Service Object:
Once you create your handler type and Handle function, it can be added to api.go.
This file is also where you can connect your service object to the handler.
For example, our ListsMoves Handler will be passed the service object interface as follows:
primeAPI.MoveTaskOrderListMovesHandler = ListMovesHandler{
    ctx,
    movetaskorder.NewMoveTaskOrderFetcher(),
}
Additionally in your file containing the handler make sure to pass in the services to your struct:
type ListMovesHandler struct {
    handlers.HandlerConfig
    services.MoveTaskOrderFetcher
}
How to handle errors
For more information on how we handle errors, check out our detailed documentation.
Add event key and update event map
Each API has a corresponding file in /pkg/services/event/<apiName>_endpoint.go
- Add new
constto represent event key - Add event key to endpoint map in the same file, using the event key name, api name, and operation ID.
An example of an event key for MoveTaskOrder Create Handler is as follows:
// MoveTaskOrderCreateEventKey is a key containing MoveTaskOrder.Create
const MoveTaskOrderCreateEventKey KeyType = "MoveTaskOrder.Create"
The event would be added to the event map called eventModels:
var eventModels = map[KeyType]eventModel{
    EndpointEventKey:                    {EndpointEventKey, models.Model{}}, // this is an example
    NewEndpointEventKey:                 {NewEndpointEventKey, models.Model{}}, // this is an example
    MoveTaskOrderCreateEventKey:         {MoveTaskOrderCreateEventKey, models.Move{},
}
If you'd like to learn more about event triggers, you can find more details here.