Factory Test Data Generation
Prologue
We are transitioning to a new package for test data generation. It's located at pkg/factory. We previously used pkg/testdatagen - so much of this document will be similar to the testdatagen version, but we're going to phase that one out eventually.
The main difference is that the massive struct of Assertions has been replaced by a list of Customizations. A Customization is a wrapper or container for our models. They tell the factory - here are the customizations we want to make to this model.
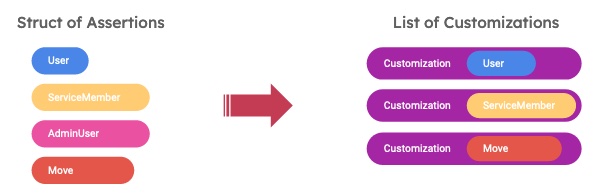
By packaging them in nice identical containers, we get some useful features that help us reduce confusion, catch errors early, and add new mechanisms.
Rules and Recommendations
NEVER nest a model within a model.
Put each model in its own
Customizationin the list. Use theCustomTypeto indicate if you want a model to be linked in a specific location. See Customizations.Use traits for commonly used patterns.
Don't create variants of the Build functions unless the default build function should build something that another variant would like to exclude. An example is
BuildDutyLocationandBuildDutyLocationWithoutTransportationOfficeWhere possible, create a
Trait- they are much more flexible and allow us to mix and match useful traits. See Traits.Don't reuse your customization list.
The Build functions modify the customization list that is passed in. Create a trait if you want to reuse customizations.
Select the right
Typefor yourCustomization.See CustomTypes.
Use LinkOnly to hook up a premade model.
See LinkOnly
If a
pkg/factory/<model>_factory.goexists for your model, please use it.
Current Status
We are transitioning to the Build functions over time. To know which ones to use, simply check the pkg/factory folder. If a <model>_factory.go exists for your model, please use it. Even if you are using testdatagen functions within the same test. It should work seamlessly.
Why we use factory functions
When we unit test our code, we need a way to insert records in the database to test with. We need sample records to manipulate, update, delete, etc.
We could create them by using Pop to create in the DB directly. However, our records have a lot of interdependencies and constraints. Here’s a subset of the constraints you’d have to understand, and handle, to create a payment request:
- Payment requests must link to existing service items.
- Payment requests must link to an existing move record.
- The move must link to an existing orders record.
- Payment requests must use a sequence_id > 0
- Payment requests must have a PaymentRequestNumber the list goes on…
So to test something as simple as approving a Payment Request, you’d be writing a lot of test code just to create that Payment Request.
That’s where factory.Build functions come in handy. They efficiently create records with default values, while creating all the dependent records, and even allow you to override default values.
It's important to note that they create records in the db by default, so if you just want a model that doesn't need to exist in the db, you want to request a "stub" of the model. That will just be an in-memory model populated with data.
Basic Concepts
Build functions
The factory functions are typically called Build<Model> and take a database connection, a list of customizations and a list of traits. They return a model prepopulated with data, which is created by applying defaults, customizations and traits. I'll explain more as we go.
For now, know that testdatagen.Make<Model> is being replaced by factory.Build<Model>, the factory will return a populated model in-memory.
Example:
testdatagen.MakeAdminUser→factory.BuildAdminUser
Database
Most Build functions will take a database parameter, such as suite.DB().
To get a stubbed return model, simply pass in nil as your database. No records will be created.
Customizations
As mentioned, we can pass in customizations to the factory. A customization is simply a wrapper containing the model with the fields we want modified.
Here's what the Customization struct looks like:
type Customization struct {
 Model     interface{}
 Type      *CustomType
 LinkOnly  bool
}
Model- The model containing the fields we want modifiedType- Optional param of typeCustomTypethat tells the factory what type of model is provided. Default is the type of the model.In most cases, there is no need to provide this as the factory can detect the type. However, there are a few instances where the factory needs to know how to hookup the model (like DeliveryAddress vs. PickupAddress) where the caller must provide the
CustomType. See Custom Types.LinkOnly- Bool that tells the factory to only link (and not create) this model. Default is false. See LinkOnly.
Since the factory will build multiple models, we pass in a list of Customizations, not just one. Then, if your model needs another model to be created, the factory will pass on your Customizations to the appropriate model factory.
Example:
To create a User with a specific LoginGovEmail, we can do the following:
  // Create a User with a customized email
  user := BuildUser(suite.DB(), []Customization{
   {
    Model: models.User{
     LoginGovEmail: customEmail,
    },
   },
  }, nil)
The resulting user will have defaults for all other fields, but the customEmail will override the default LoginGovEmail.
CustomTypes
CustomTypes tell the factory where to apply these modifications. In most cases, there's really only one of each type because of the way the dependencies work.
If you're creating a service item, there's only one service item, service member, shipment, move etc. associated with it. So you can simply provide a Move model, a ServiceMember model etc, and the factory will know how to hook that in.
Example:
To create an AdminUser whose User should have a customEmail, just provide the User, no need to add a Type.
  // Create an AdminUser
  user := BuildAdminUser(suite.DB(), []Customization{
   {
    Model: models.User{ // ← Type field not required, defaults to model type
     LoginGovEmail: customEmail,
    },
   },
  }, nil)
In a few cases, there might be more than one. These cases are:
- Addresses
- DutyLocations
- Dimensions
So for those, you should tell the factory where you want to hook that model up. Is it a PickupAddress? Or a SecondaryDeliveryAddress?
  // Create a User with a specific PickupAddress
  user := BuildUser(suite.DB(), []Customization{
   {
    Model: models.Address{
     LoginGovEmail: customEmail,
    },
    Type: Addresses.PickupAddress, // ← Type field required
   },
  }, nil)
LinkOnly
To supply a premade model, just pass in a customization with the premade model, and set LinkOnly to true. This tells the factory to only link (and not create) this model.
Example:
Say you have a user and you want to create an associated AdminUser. You call BuildAdminUser but provide a link-only User.
  adminUser := BuildAdminUser(suite.DB(), []Customization{
   {
    Model:    user,
    LinkOnly: true,
   },
  }, nil)
Traits
At times, there are common repeated customizations.
For e.g. it's common to want the AdminUser.Email to match the User.LoginGovEmail. Rather than reconstructing these each time, you can create a Trait functions that combines both Customizations.
These can be flexibly applied with other traits and customizations in priority order. You could pass in multiple traits like GetTraitActiveUser and GetTraitNavy.
The traits are applied in Priority Order.
The trait functions take no parameters and return a list of customizations. Anyone can define them, either in their own test code or in the factory code, if generally useful.
Example:
To create a trait that sets both AdminUser.Email and User.LoginGovEmail to the same value and use a random string to ensure uniqueness:
// GetTraitAdminUserEmail sets unique matching emails
func GetTraitAdminUserEmail() []Customization {
 // There's a uniqueness constraint on admin user emails so add randomness
 email := strings.ToLower(fmt.Sprintf("email_%s@example.com", makeRandomString(5)))
 return []Customization{
  {
    Model: models.User{
      LoginGovEmail: email,
    },
  },
  {
    Model: models.AdminUser{
      Email: email,
    },
  },
 }
}
To use the trait:
  // Create AdminUser with correct emails
  adminUser := BuildAdminUser(suite.DB(), []Customization{
   {
      Model: models.User{
        LoginGovUUID: uuid,
      },
   },
  }, []Trait{
    GetTraitAdminUserEmail, // ← Trait added
  })
Priority Order
You might be wondering what gets priority - Customizations or Traits.
Essentially we start creating the model with the defaults, override those with traits, and override those with customizations. This means the user passed-in customizations have the highest priority.
Priority order is as follows:
Customizationspassed in by the user get the highest priority.Traitsget second priority, with earlier traits in the list overriding later traits.- Default values get last priority.
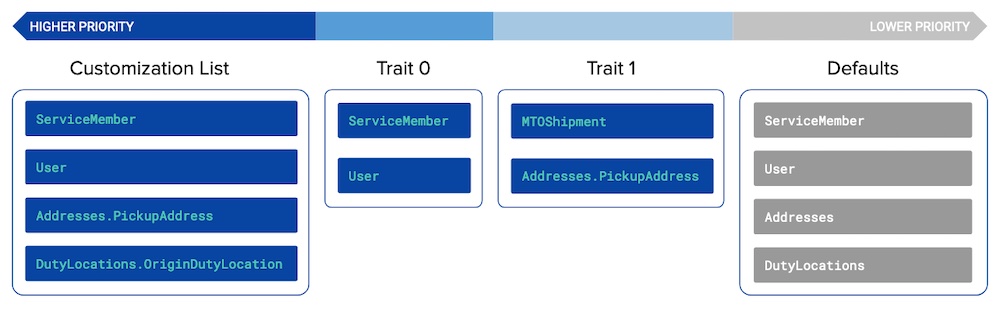
Note that the factory applies priority on a field-by-field basis. So if, in the above image, you didn't override User.Email in either the customization or traits, then the return model will contain the default User.Email.
The factory will populate all fields that are not overriden, with factory defaults.