Test data generation
When working with or testing our system, it can be helpful to have sample data in the system that gives you good starting points for different steps in the process and/or seeing different features in action.
Scenarios and Usage
We have data set up for various scenarios and use cases. You can find them in pkg/testdatagen/scenario.
devseed- Used to populate the localdevdatabase and for the databases used in Ephemeral environments.e2ebasic- Used by our e2e tests, either by Circle CI, or when you run those tests locally (depending on how you run them).
Usage
To generate the test data, you can use either make targets that are set up to use specific sets of data, or you can use the generate-test-data command.
Make targets
We have several make targets that will set up data for you. For example make db_dev_fresh will start up your dev db, clear out any existing data, and populate it with the data defined in the devseed.go file. You can also use make db_dev_e2e_populate which is similar, but it expects the dev db to already be running, and it doesn't recreate the database from scratch, which can make it faster if you have already set up your db previously and don't want to start from the beginning.
You can also use make db_e2e_up (or any make targets that use the db_e2e_up target), which instead of using the dev db and devseed.go, will instead populate the test with the data defined in e2ebasic.go.
generate-test-data command
We also have a command that can be used to customize which scenario is used and which database is populated. This is actually what is used by the make targets described above.
To use it:
- Run
make bin/generate-test-data- This will build the fake data generator binary.
- Run
DB_PORT=5433 bin/generate-test-datawith the options you want:--named-scenario=is used to define which scenario you want to use, e.g.--named-scenario="dev_seed"or--named-scenario="e2e_basic"- Note that the names here are slightly different from the file names. You can find the name of the scenario that you need by opening the file in
pkg/testdatagen/scenariothat you're interested and looking near the top for something similar to this:var DevSeedScenario = devSeedScenario{"dev_seed"}but with all the var names being different since they're defined based on the scenario they're for.
- Note that the names here are slightly different from the file names. You can find the name of the scenario that you need by opening the file in
--named-sub-scenariois an optional param used to define which sub-scenario you want to use in the specified named scenario. E.g.--named-scenario="dev_seed" --named-sub-scenario="shipment_hhg_cancelled"--db-env=is used to define the environment you want to use for the database, e.g.--db-env="development"or--db-env="test"
So a sample command might look like this:
DB_PORT=5433 bin/generate-test-data --named-scenario=e2e_basic --db-env="test"
Numbered Scenarios
Some of the scenarios are numbered, so if you want to run one of those, you'll need to add another argument to your generate-test-data call, --scenario=, where the value is a number. We technically have the following numbered scenarios:
- --scenario=1 for Award Queue Scenario 1
- --scenario=2 for Award Queue Scenario 2
- --scenario=3 for Duty Station Scenario
- --scenario=4 for PPM or PPM SIT Estimate Scenario (can also use Rate Engine Scenarios for Estimates)
- --scenario=5 for Rate Engine Scenario 1
- --scenario=6 for Rate Engine Scenario 2
- --scenario=7 for TSP test data
Sub-scenarios (devseed only, optional)
A sub-scenario using the --named-sub-scenario option is a recent addition to the generate-test-data script. It's mainly used to run a very specific sub-scenario within a named scenario. If a sub-scenario is not specified, then the entire named scenario will run which includes the sub-scenario.
Currently available sub-scenarios for each main named scenarios:
dev_seedadditional_ppm_users: creates additional ppm users for testingdiverted_shipments: creates shipments that are divertedhhg_onboarding: creates hhg shipments for TOO/TIO onboardinghhg_services_counseling: creates hhg shipments for Services Counselingpayment_request_calculations: creates payment requests under move codePARAMSto show calculations for the TIOppm_and_hhg: creates a combo ppm and hhg shipmentsppm_office_queue: creates moves for the ppm office queueshipment_hhg_cancelled: creates an hhg shipment that is in the cancelled state.txo_queues: creates moves for the TXO queuesmisc: creates misc seed data (see sub-scenario for more info)
Data Generation
The scenarios use our testdatagen functions to quickly wire up the data they need. You can find more info on using testdatagen functions here
Updating Scenarios
If you want to add more data to a given scenario, or tweak it, you can edit the file of the scenario you want as needed.
Adding a New Case (e2ebasic and bandwidth only)
If you are adding a new case, e.g. an un-submitted move with an HHG shipment that has multiple destination addresses, you would add a function to the file like this:
func createUnsubmittedHHGMoveMultipleDestinations(db *pop.Connection) {
    /*
    A service member with an un-submitted move that has an HHG shipment going to multiple destination addresses
    */

    email := "hhg-multple-destinations@unsubmitted"
    uuidStr := "f08146cf-4d6b-43d5-9ca5-c8d239d37b3e"
    loginGovUUID := uuid.Must(uuid.NewV4())

    testdatagen.MakeUser(db, testdatagen.Assertions{
        User: models.User{
            ID:            uuid.Must(uuid.FromString(uuidStr)),
            LoginGovUUID:  &loginGovUUID,
            LoginGovEmail: email,
            Active:        true,
        },
    })

    // rest of logic for creating the move/shipment as needed
}
Note that we use a combo of hard-coded UUIDs (e.g. "f08146cf-4d6b-43d5-9ca5-c8d239d37b3e") and generated UUIDs (uuid.Must(uuid.NewV4())). We have the hard-coded ones where it is helpful to have an ID we can easily look up. It also makes it nice so that when you refresh the database, you can still use those same IDs (e.g. reloading some pages will work and give you the fresh data).
Then down in the Run function, you`d add a call to your new function wherever seems appropriate. In our example, this would probably go well with the other onboarding data e.g.
// Run does that data load thing
func (e devSeedScenario) Run(db *pop.Connection, userUploader *uploader.UserUploader, primeUploader *uploader.PrimeUploader, routePlanner route.Planner, logger Logger) {
    // other creation logic

    // Onboarding
    createUnsubmittedHHGMove(db)
    createUnsubmittedHHGMoveMultipleDestinations(db)
    createUnsubmittedMoveWithNTSAndNTSR(db)
    createServiceMemberWithOrdersButNoMoveType(db)
    createServiceMemberWithNoUploadedOrders(db)

    // other creation logic.
}
Now you should be able to run the commands to populate the database and see your data.
An important thing to note is that the email you use in your user creation (SMs and office users), is the email used to display on the local log in page, so the better your email, the easier it is to use:
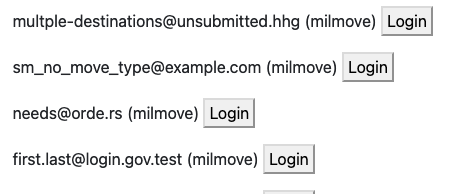
In the screenshot above, our new service member can be seen quickly and easily. If you notice though, the last email in that screenshot is first.last@login.gov.test (milmove). That's what happens when you don't specify the email, which makes it harder to know what that service member (or office user if in the office side) is set up with. This also happens when we accidentally use the testdatagen functions incorrectly and they generate extra users that we don't actually want.
Adding a Sub-Scenario (devseed only)
To add in a new sub-scenario:
- Create a sub-scenario function in the
subscenarios.gofile:
func myNewSubScenario() func() {
    // notice that we're returning a function here
    // this is to create a closure function so we can use the params passed in for later in the sub-scenario list
    return func() {
        // code that seeds data
    }
}
- Add new sub-scenario function to the list in the
Setup()function located indevseed.go:
// Setup initializes the setup data for devseed
// this is where the sub-scenarios are set up and stored
func (e *devSeedScenario) Setup(db *pop.Connection, userUploader *uploader.UserUploader, primeUploader *uploader.PrimeUploader, logger Logger) {
    // add the name of your sub-scenario as the key
    // add the sub-scenario function as the value
    e.SubScenarios = map[string]func(){
        "my_new_sub_scenario": myNewSubScenario(),
    }
}
That's it! The new sub-scenario is added to the list and can now be used by running:
generate-test-data --named-scenario="dev_seed" --named-sub-scenario="my_new_sub_scenario" --db-env="development"
Or by running the make cmd:
DEVSEED_SUBSCENARIO=mySubScenario make db_dev_e2e_populate
Troubleshooting
My changes are not there when running generate-test-data. What do I do?
This is most likely because the binary file is not updated. You can regenerate the binary by running these commands in the project directory:
rm bin/generate-test-data && make bin/generate-test-data
Or using the go cmd directly:
go run github.com/transcom/mymove/cmd/generate-test-data --named-scenario="dev_seed" --db-env="development" --named-sub-scenario="mySubScenario"